Interactive map · fan-made schematic
GTA 6 interactive map
71 locations confirmed by two or more guides, each with its sources. Tick them off and your trackers update too. Skip to the location list.
0 / 71 found
Every pin is an approximate area marker on ViceBoard’s own schematic of Leonida: it sits on the town, district or landmark a published guide names, nudged only when that guide gives a direction (for example “south side”). It is not a street address. Confirmed pins have two or more independent sources; single-source pins and reported card spots stay hidden until you switch those layers on. We do not invent coordinates. Flamingos, stunt jumps and other large sets get pins only when two guides publish a place. Ammu-Nation shops are pinned only when a source names a labelled town; the rest of the 24-store list is on the Ammu-Nation guide. PowerPyx lists 19 Pay ’n’ Sprays today; LibertyCity.net’s public list shows 20 — that count is flagged, and we keep the 19 named neighbourhoods that PowerPyx, Tech4Gamers and Leonipedia share. Grid squares (for example G7) follow the 1–9 / A–M index on Rockstar’s free public Leonida map (print-ready download). This page does not use Rockstar map art or another site’s tiles.
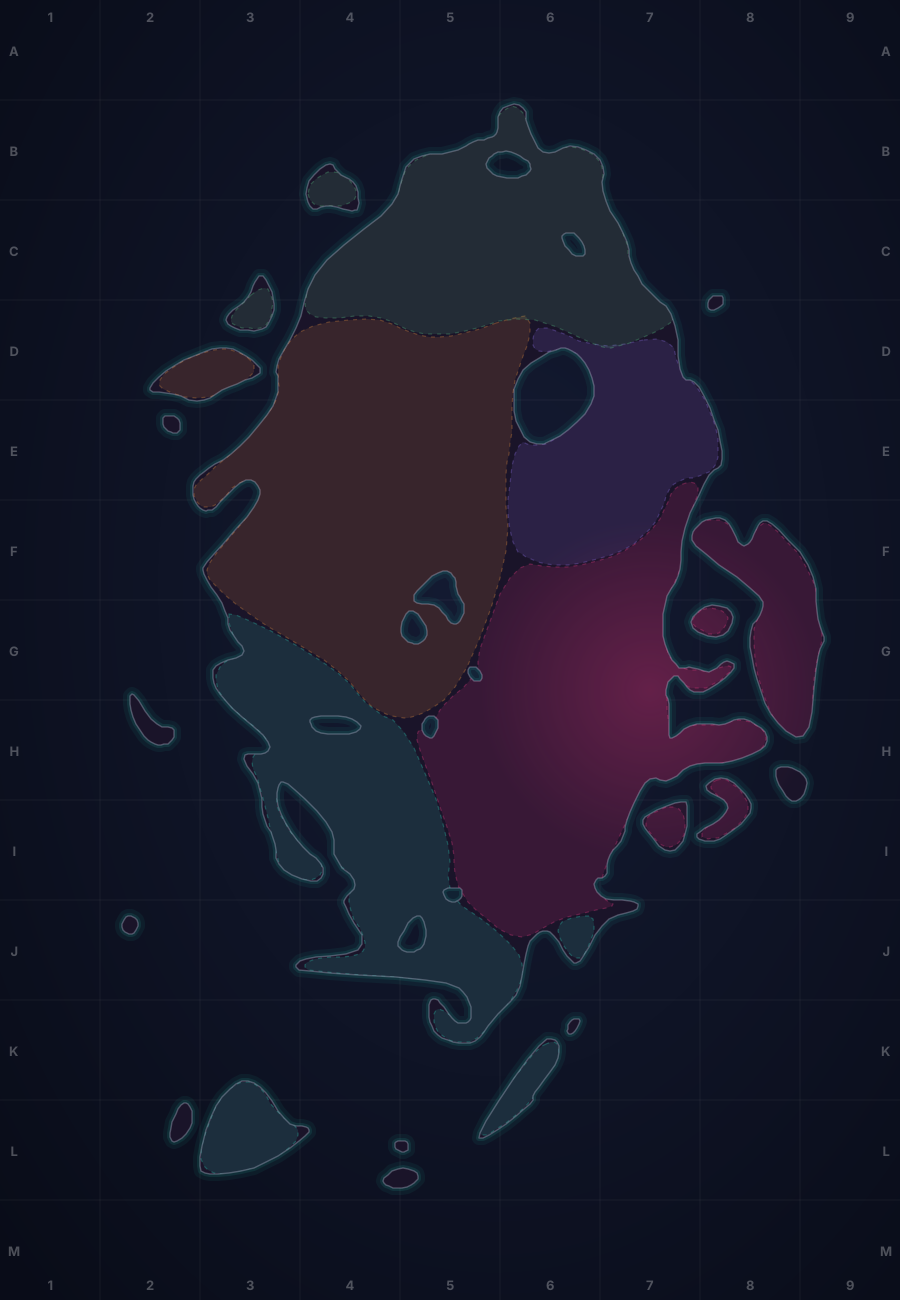
Fan-made schematic · pins mark a sourced area (approximate), not a street address
All map locations by region
Every pin on the map, with its grid square on the 1–9 / A–M grid on Rockstar’s free public Leonida map, directions and sources (full links in Sources below). Confirmed = 2+ independent publishers name the area. Single source = one report, not yet cross-checked.
Vice-Dale County & Vice City · 35 confirmed, 1 single-source
Vice City, Vice Beach, the bay islands and the airport.
-
Griffin Shooting Range
Approximate areaShooting rangeConfirmed · 3 sourcesNorth-west Vice City · grid G6
18 gold-medal challenges. Buy the $5 Waiver Pass from the clerk first.
Sources: PowerPyx, Sweat School, GTA Culture · Tracker · Shooting range locations · Show on map
-
Lombank – Peacock Bay
Approximate areaBankConfirmed · 2 sourcesPeacock Bay · grid I7
Small bank: no vault. Counts toward the 22 Bank Jobs.
Sources: PowerPyx, LibertyCity.net · Tracker · Bank locations · Unlock vaults · Show on map
-
Fleeca – Peacock Bay
Approximate areaBankConfirmed · 2 sourcesPeacock Bay · grid I7
Small bank: no vault. Counts toward the 22 Bank Jobs.
Sources: PowerPyx, LibertyCity.net · Tracker · Bank locations · Unlock vaults · Show on map
-
Shorefront – Downtown
Approximate areaBankConfirmed · 2 sourcesDowntown · grid G7
Small bank: no vault. Counts toward the 22 Bank Jobs.
Sources: PowerPyx, LibertyCity.net · Tracker · Bank locations · Unlock vaults · Show on map
-
Shorefront – Rockridge
Approximate areaBankConfirmed · 2 sourcesRockridge · grid G6
Small bank: no vault. Counts toward the 22 Bank Jobs.
Sources: PowerPyx, LibertyCity.net · Tracker · Bank locations · Unlock vaults · Show on map
-
Lombank – Bayside
Approximate areaBankConfirmed · 2 sourcesBayside · grid G7
Small bank: no vault. Counts toward the 22 Bank Jobs.
Sources: PowerPyx, LibertyCity.net · Tracker · Bank locations · Unlock vaults · Show on map
-
Fleeca – Washington Beach
Approximate areaBankConfirmed · 2 sourcesWashington Beach · grid F9
Small bank: no vault. Counts toward the 22 Bank Jobs.
Sources: PowerPyx, LibertyCity.net · Tracker · Bank locations · Unlock vaults · Show on map
-
Lombank – Ocean Beach
Approximate areaBankConfirmed · 2 sourcesOcean Beach · grid G9
Small bank: no vault. Counts toward the 22 Bank Jobs.
Sources: PowerPyx, LibertyCity.net · Tracker · Bank locations · Unlock vaults · Show on map
-
Fleeca – Ocean Beach
Approximate areaBankConfirmed · 2 sourcesOcean Beach · grid G8
Small bank: no vault. Counts toward the 22 Bank Jobs.
Sources: PowerPyx, LibertyCity.net · Tracker · Bank locations · Unlock vaults · Show on map
-
Shorefront – Ocean Beach
Approximate areaBankConfirmed · 2 sourcesOcean Beach · grid G9
Small bank: no vault. Counts toward the 22 Bank Jobs.
Sources: PowerPyx, LibertyCity.net · Tracker · Bank locations · Unlock vaults · Show on map
-
Fleeca – VCIA (vault)
Approximate areaBankConfirmed · 3 sourcesVice City International Airport (VCIA) · grid H6
Large bank with a vault. Counts toward the 22 Bank Jobs and the 8 vaults for Maximum Withdrawal.
Sources: PowerPyx, LibertyCity.net, Leonipedia · Tracker · Bank locations · Unlock vaults · Show on map
-
Fleeca – Tequesta (vault)
Approximate areaBankConfirmed · 3 sourcesTequesta · grid H7
Large bank with a vault. Counts toward the 22 Bank Jobs and the 8 vaults for Maximum Withdrawal.
Sources: PowerPyx, LibertyCity.net, Leonipedia · Tracker · Bank locations · Unlock vaults · Show on map
-
Lombank – Downtown (vault)
Approximate areaBankConfirmed · 3 sourcesDowntown · grid H7
Large bank with a vault. Counts toward the 22 Bank Jobs and the 8 vaults for Maximum Withdrawal.
Sources: PowerPyx, LibertyCity.net, Leonipedia · Tracker · Bank locations · Unlock vaults · Show on map
-
Fleeca – Downtown (vault)
Approximate areaBankConfirmed · 3 sourcesDowntown · grid G7
Large bank with a vault. Counts toward the 22 Bank Jobs and the 8 vaults for Maximum Withdrawal.
Sources: PowerPyx, LibertyCity.net, Leonipedia · Tracker · Bank locations · Unlock vaults · Show on map
-
Lombank – Ocean Beach (vault)
Approximate areaBankConfirmed · 3 sourcesOcean Beach · grid G9
Large bank with a vault. Counts toward the 22 Bank Jobs and the 8 vaults for Maximum Withdrawal.
Sources: PowerPyx, LibertyCity.net, Leonipedia · Tracker · Bank locations · Unlock vaults · Show on map
-
Fleeca – Ocean Beach (vault)
Approximate areaBankConfirmed · 3 sourcesOcean Beach · grid G8
Large bank with a vault. Counts toward the 22 Bank Jobs and the 8 vaults for Maximum Withdrawal.
Sources: PowerPyx, LibertyCity.net, Leonipedia · Tracker · Bank locations · Unlock vaults · Show on map
-
Lombank – Ocean Beach (vault)
Approximate areaBankConfirmed · 3 sourcesOcean Beach · grid G9
Large bank with a vault. Counts toward the 22 Bank Jobs and the 8 vaults for Maximum Withdrawal.
Sources: PowerPyx, LibertyCity.net, Leonipedia · Tracker · Bank locations · Unlock vaults · Show on map
-
Shorefront – Ocean Beach (vault)
Approximate areaBankConfirmed · 3 sourcesOcean Beach · grid G8
Large bank with a vault. Counts toward the 22 Bank Jobs and the 8 vaults for Maximum Withdrawal.
Sources: PowerPyx, LibertyCity.net, Leonipedia · Tracker · Bank locations · Unlock vaults · Show on map
-
Tyrone (fence)
Approximate areaFenceConfirmed · 2 sourcesLa Perle, Vice City · grid G7
Best for narcotics. Chapter 3+.
Sources: PowerPyx, Bloxodes · Tracker · Money and fences · Sell cars · Show on map
-
Yasmani (fence)
Approximate areaFenceConfirmed · 2 sourcesLittle Cuba, Vice City · grid G7
Best for jewelry and marked bills. Chapter 3+.
Sources: PowerPyx, Bloxodes · Tracker · Money and fences · Sell cars · Show on map
-
Randy’s garage (car fence)
Approximate areaFenceConfirmed · 2 sourcesBalsero, west Vice City · grid G6
High-end cars from Randy’s Wish List. Chapter 3+.
Sources: PowerPyx, Bloxodes · Tracker · Money and fences · Sell cars · Show on map
-
Yago: The street racer
Approximate areaSide-mission startConfirmed · 3 sourcesSalton, Vice City · grid H6
Start: Message after Dealer’s Choice; race in Salton. 4 missions; ticks when all are done.
Sources: Sixth Star, Output Lag, PowerPyx · Tracker · Side missions · Show on map
-
Yasmani: The fence
Approximate areaSide-mission startConfirmed · 3 sourcesLittle Cuba, Vice City · grid H6
Start: Main mission Yasmani’s Jewelry Jobs. 4 missions; ticks when all are done.
Sources: Sixth Star, Output Lag, PowerPyx · Tracker · Side missions · Show on map
-
Eddie Acosta: The crypto party
Approximate areaSide-mission startSingle sourceY Hotel, Ocean Beach · grid G8
Start: Invite during Pool Day; Y Hotel, Ocean Beach. 1 mission; ticks when all are done.
Sources: Sixth Star · Tracker · Side missions · Show on map
-
Pay ’n’ Spray – Hamlet
Approximate areaPay ’n’ SprayConfirmed · 3 sourcesHamlet · grid I6
Repair and respray (clears “Vehicle recognized”, not your stars). From Chapter 3 it also registers and buys Standard Tracker cars.
Sources: LibertyCity.net, GTA 6 Wiki (Tech4Gamers), Leonipedia · Pay ’n’ Spray guide · Register a car · Show on map
-
Pay ’n’ Spray – Salton
Approximate areaPay ’n’ SprayConfirmed · 3 sourcesSalton · grid H6
Repair and respray (clears “Vehicle recognized”, not your stars). From Chapter 3 it also registers and buys Standard Tracker cars.
Sources: LibertyCity.net, GTA 6 Wiki (Tech4Gamers), Leonipedia · Pay ’n’ Spray guide · Register a car · Show on map
-
Pay ’n’ Spray – West Vice-Dale County
Approximate areaPay ’n’ SprayConfirmed · 3 sourcesWest Vice-Dale County · grid H6
Repair and respray (clears “Vehicle recognized”, not your stars). From Chapter 3 it also registers and buys Standard Tracker cars.
Sources: LibertyCity.net, GTA 6 Wiki (Tech4Gamers), Leonipedia · Pay ’n’ Spray guide · Register a car · Show on map
-
Pay ’n’ Spray – Downtown
Approximate areaPay ’n’ SprayConfirmed · 3 sourcesDowntown · grid H7
Repair and respray (clears “Vehicle recognized”, not your stars). From Chapter 3 it also registers and buys Standard Tracker cars.
Sources: LibertyCity.net, GTA 6 Wiki (Tech4Gamers), Leonipedia · Pay ’n’ Spray guide · Register a car · Show on map
-
Pay ’n’ Spray – Balsero
Approximate areaPay ’n’ SprayConfirmed · 3 sourcesBalsero · grid G6
Repair and respray (clears “Vehicle recognized”, not your stars). From Chapter 3 it also registers and buys Standard Tracker cars.
Sources: LibertyCity.net, GTA 6 Wiki (Tech4Gamers), Leonipedia · Pay ’n’ Spray guide · Register a car · Show on map
-
Pay ’n’ Spray – La Perle
Approximate areaPay ’n’ SprayConfirmed · 3 sourcesLa Perle · grid G7
Repair and respray (clears “Vehicle recognized”, not your stars). From Chapter 3 it also registers and buys Standard Tracker cars.
Sources: LibertyCity.net, GTA 6 Wiki (Tech4Gamers), Leonipedia · Pay ’n’ Spray guide · Register a car · Show on map
-
Pay ’n’ Spray – Stockyard
Approximate areaPay ’n’ SprayConfirmed · 3 sourcesStockyard · grid F7
Repair and respray (clears “Vehicle recognized”, not your stars). From Chapter 3 it also registers and buys Standard Tracker cars.
Sources: LibertyCity.net, GTA 6 Wiki (Tech4Gamers), Leonipedia · Pay ’n’ Spray guide · Register a car · Show on map
-
Pay ’n’ Spray – Waxman Island
Approximate areaPay ’n’ SprayConfirmed · 3 sourcesWaxman Island · grid G8
Repair and respray (clears “Vehicle recognized”, not your stars). From Chapter 3 it also registers and buys Standard Tracker cars.
Sources: LibertyCity.net, GTA 6 Wiki (Tech4Gamers), Leonipedia · Pay ’n’ Spray guide · Register a car · Show on map
-
Pay ’n’ Spray – Ocean Beach
Approximate areaPay ’n’ SprayConfirmed · 3 sourcesOcean Beach · grid G9
Repair and respray (clears “Vehicle recognized”, not your stars). From Chapter 3 it also registers and buys Standard Tracker cars.
Sources: LibertyCity.net, GTA 6 Wiki (Tech4Gamers), Leonipedia · Pay ’n’ Spray guide · Register a car · Show on map
-
Pay ’n’ Spray – Washington Beach
Approximate areaPay ’n’ SprayConfirmed · 3 sourcesWashington Beach · grid F8
Repair and respray (clears “Vehicle recognized”, not your stars). From Chapter 3 it also registers and buys Standard Tracker cars.
Sources: LibertyCity.net, GTA 6 Wiki (Tech4Gamers), Leonipedia · Pay ’n’ Spray guide · Register a car · Show on map
-
Catch Me If You Can: the VCIA jet
Approximate areaTrophy spotConfirmed · 2 sourcesVice City International Airport, gates E3/E4 · grid H6
The jet at a boarding bridge by gates E3/E4. Story-related: open the guide for the spoiler-marked steps.
Sources: PowerPyx, Leonipedia · Tracker · Show on map
-
Sneakthief: Richardson Jewelry & Diamonds
Approximate areaTrophy spotConfirmed · 2 sourcesVice City · grid G7
The jewelry store robbery for Sneakthief. Open the guide for the route.
Sources: PowerPyx, Leonipedia · Tracker · Show on map
Mariana County & the Keys · 13 confirmed, 1 single-source
Key Lento, the Keys, Grassrivers wetlands, Watson Bay and Capri.
-
Jason’s House balcony
Approximate areaMeditation spotConfirmed · 4 sourcesKey Lento · grid L6
Lucia meditates on the balcony of Jason’s house in Chapter 1 (after Down to Earth, check the kitchen in the morning). Missable: gone once Chapter 1 ends. 1 meditation.
Sources: PowerPyx, GTA Culture, Tech4Gamers, Output Lag · Tracker · Meditation spots · Missables · Show on map
-
Smooth Sand
Approximate areaMeditation spotConfirmed · 3 sourcesCapri · grid G3
A sandbar off the coast west of Capri. 2 meditations.
Sources: PowerPyx, GTA Culture, Tech4Gamers · Tracker · Meditation spots · Missables · Show on map
-
Fleeca – Key Lento
Approximate areaBankConfirmed · 2 sourcesKey Lento · grid L6
Small bank: no vault. Counts toward the 22 Bank Jobs.
Sources: PowerPyx, LibertyCity.net · Tracker · Bank locations · Unlock vaults · Show on map
-
Shorefront – Watson Bay
Approximate areaBankConfirmed · 2 sourcesWatson Bay · grid J4
Small bank: no vault. Counts toward the 22 Bank Jobs.
Sources: PowerPyx, LibertyCity.net · Tracker · Bank locations · Unlock vaults · Show on map
-
Gibson Brothers Bank
Approximate areaBankSingle sourceCapri · grid G3
Small bank. PowerPyx lists it in Mariana County; only LibertyCity.net places it in Capri.
Sources: PowerPyx, LibertyCity.net · Tracker · Bank locations · Unlock vaults · Show on map
-
Brian’s Lockup (fence)
Approximate areaFenceConfirmed · 2 sourcesSouth Key Lento · grid L6
Chapter 1 only (after Lab Fees). Very low prices.
Sources: PowerPyx, Bloxodes · Tracker · Money and fences · Sell cars · Show on map
-
Donnie’s Trailer (fence)
Approximate areaFenceConfirmed · 2 sourcesSouth Key Lento · grid L6
Chapter 1 until Swamped. Low prices for narcotics.
Sources: PowerPyx, Bloxodes · Tracker · Money and fences · Sell cars · Show on map
-
Shirley: Jason’s neighbor
Approximate areaSide-mission startConfirmed · 3 sourcesKey Lento, on the way to Pipework · grid K6
Start: Key Lento, on the way to Pipework. 2 missions; ticks when all are done.
Sources: Sixth Star, Output Lag, PowerPyx · Tracker · Side missions · Show on map
-
Kenton Rees: The treasure diver
Approximate areaSide-mission startConfirmed · 3 sourcesHis dive shop in Key Lento · grid L6
Start: His dive shop in Key Lento after Island Dreams. 7 missions; ticks when all are done.
Sources: Sixth Star, Output Lag, PowerPyx · Tracker · Side missions · Show on map
-
Pay ’n’ Spray – Southwind
Approximate areaPay ’n’ SprayConfirmed · 3 sourcesSouthwind · grid L3
Repair and respray (clears “Vehicle recognized”, not your stars). From Chapter 3 it also registers and buys Standard Tracker cars.
Sources: LibertyCity.net, GTA 6 Wiki (Tech4Gamers), Leonipedia · Pay ’n’ Spray guide · Register a car · Show on map
-
Pay ’n’ Spray – Key Lento
Approximate areaPay ’n’ SprayConfirmed · 3 sourcesKey Lento · grid L6
Repair and respray (clears “Vehicle recognized”, not your stars). From Chapter 3 it also registers and buys Standard Tracker cars.
Sources: LibertyCity.net, GTA 6 Wiki (Tech4Gamers), Leonipedia · Pay ’n’ Spray guide · Register a car · Show on map
-
Pay ’n’ Spray – Watson Bay
Approximate areaPay ’n’ SprayConfirmed · 3 sourcesWatson Bay · grid J4
Repair and respray (clears “Vehicle recognized”, not your stars). From Chapter 3 it also registers and buys Standard Tracker cars.
Sources: LibertyCity.net, GTA 6 Wiki (Tech4Gamers), Leonipedia · Pay ’n’ Spray guide · Register a car · Show on map
-
Pay ’n’ Spray – Grassrivers
Approximate areaPay ’n’ SprayConfirmed · 3 sourcesGrassrivers · grid I5
Repair and respray (clears “Vehicle recognized”, not your stars). From Chapter 3 it also registers and buys Standard Tracker cars.
Sources: LibertyCity.net, GTA 6 Wiki (Tech4Gamers), Leonipedia · Pay ’n’ Spray guide · Register a car · Show on map
-
Challenging (hidden trophy): the tanks
Approximate areaTrophy spotConfirmed · 2 sourcesMile Zero Air Station, south side · grid L3
The tanks stand on the south side of the air base. Driving one earns the trophy.
Sources: Output Lag, PowerPyx · Tracker · Show on map
Kelly County · 13 confirmed
Port Gellhorn, the Buckskin Swamp, Emerald River and Manifest Canyon.
-
Swamp
Approximate areaMeditation spotConfirmed · 3 sourcesBuckskin Swamp · grid G5
A dock in the Buckskin Swamp. 2 meditations.
Sources: PowerPyx, GTA Culture, Tech4Gamers · Tracker · Meditation spots · Missables · Show on map
-
Worn Stone
Approximate areaMeditation spotConfirmed · 3 sourcesEmerald Springs · grid F5
Camp Moonflower on the Emerald River. 2 meditations.
Sources: PowerPyx, GTA Culture, Tech4Gamers · Tracker · Meditation spots · Missables · Show on map
-
Red Rocks
Approximate areaMeditation spotConfirmed · 3 sourcesManifest Canyon · grid D4
Among the red rock formations of Manifest Canyon. 2 meditations.
Sources: PowerPyx, GTA Culture, Tech4Gamers · Tracker · Meditation spots · Missables · Show on map
-
Rodgers Ranch Shooting Range
Approximate areaShooting rangeConfirmed · 3 sourcesNorth-east of Port Gellhorn · grid E3
24 gold-medal challenges. Buy the $5 Waiver Pass from the clerk first.
Sources: PowerPyx, Sweat School, GTA Culture · Tracker · Shooting range locations · Show on map
-
Shorefront – Ambrosia
Approximate areaBankConfirmed · 2 sourcesAmbrosia · grid E5
Small bank: no vault. Counts toward the 22 Bank Jobs.
Sources: PowerPyx, LibertyCity.net · Tracker · Bank locations · Unlock vaults · Show on map
-
Dunk (fence)
Approximate areaFenceConfirmed · 2 sourcesPort Gellhorn · grid E3
Chapter 2 after Slam Dunk. Low prices.
Sources: PowerPyx, Bloxodes · Tracker · Money and fences · Sell cars · Show on map
-
Moses (car fence)
Approximate areaFenceConfirmed · 2 sourcesPort Gellhorn · grid E3
Buys older cars with no tracker.
Sources: PowerPyx, Bloxodes · Tracker · Money and fences · Sell cars · Show on map
-
Kyle McKittrick: The crop duster
Approximate areaSide-mission startConfirmed · 3 sourcesStarlet Motel office, Port Gellhorn · grid E3
Start: Pilot flyer at the Starlet Motel office. 3 missions; ticks when all are done.
Sources: Sixth Star, Output Lag, PowerPyx · Tracker · Side missions · Show on map
-
Billy: The dirt-bike crew
Approximate areaSide-mission startConfirmed · 3 sourcesThrillbilly Mud Club, Kelly County · grid D5
Start: Thrillbilly Mud Club, Kelly County, after Coffee Break. 5 missions; ticks when all are done.
Sources: Sixth Star, Output Lag, PowerPyx · Tracker · Side missions · Show on map
-
Dunk: Robbery tips
Approximate areaSide-mission startConfirmed · 3 sourcesPort Gellhorn · grid E3
Start: Port Gellhorn fence. 1 mission; ticks when all are done.
Sources: Sixth Star, Output Lag, PowerPyx · Tracker · Side missions · Show on map
-
Moses: The car fence
Approximate areaSide-mission startConfirmed · 3 sourcesPort Gellhorn · grid E3
Start: Main mission Moses, Port Gellhorn. 2 missions; ticks when all are done.
Sources: Sixth Star, Output Lag, PowerPyx · Tracker · Side missions · Show on map
-
Pay ’n’ Spray – Port Gellhorn
Approximate areaPay ’n’ SprayConfirmed · 3 sourcesPort Gellhorn · grid E3
Repair and respray (clears “Vehicle recognized”, not your stars). From Chapter 3 it also registers and buys Standard Tracker cars.
Sources: LibertyCity.net, GTA 6 Wiki (Tech4Gamers), Leonipedia · Pay ’n’ Spray guide · Register a car · Show on map
-
Pay ’n’ Spray – Ambrosia
Approximate areaPay ’n’ SprayConfirmed · 3 sourcesAmbrosia · grid E5
Repair and respray (clears “Vehicle recognized”, not your stars). From Chapter 3 it also registers and buys Standard Tracker cars.
Sources: LibertyCity.net, GTA 6 Wiki (Tech4Gamers), Leonipedia · Pay ’n’ Spray guide · Register a car · Show on map
Leonard County · 3 confirmed, 1 single-source
Lake Leonida, Belville, Waning Sands and the east coast.
-
Seaside
Approximate areaMeditation spotConfirmed · 3 sourcesWaning Sands · grid E8
On the coast east of Waning Sands. 2 meditations.
Sources: PowerPyx, GTA Culture, Tech4Gamers · Tracker · Meditation spots · Missables · Show on map
-
Druthers State Bank
Approximate areaBankSingle sourceBelville · grid F7
Small bank. PowerPyx lists it in Leonard County; only LibertyCity.net places it in Belville.
Sources: PowerPyx, LibertyCity.net · Tracker · Bank locations · Unlock vaults · Show on map
-
Andy: Cellerica
Approximate areaSide-mission startConfirmed · 3 sourcesBelville · grid F6
Start: Call from Andy, then her Belville address. 5 missions; ticks when all are done.
Sources: Sixth Star, Output Lag, PowerPyx · Tracker · Side missions · Show on map
-
Pay ’n’ Spray – Waning Sands
Approximate areaPay ’n’ SprayConfirmed · 3 sourcesWaning Sands · grid E7
Repair and respray (clears “Vehicle recognized”, not your stars). From Chapter 3 it also registers and buys Standard Tracker cars.
Sources: LibertyCity.net, GTA 6 Wiki (Tech4Gamers), Leonipedia · Pay ’n’ Spray guide · Register a car · Show on map
Lummox County · 7 confirmed
Mount Kalaga National Park, Moreau and Lake Tallaloko in the north.
-
Water Wheel
Approximate areaMeditation spotConfirmed · 3 sourcesMoreau · grid C5
A water wheel on the south side of Moreau. 2 meditations.
Sources: PowerPyx, GTA Culture, Tech4Gamers · Tracker · Meditation spots · Missables · Show on map
-
Jutting Cliff
Approximate areaMeditation spotConfirmed · 3 sourcesMount Kalaga National Park · grid C5
A cliff-top tower above a mine in Mount Kalaga National Park, north of the Kalaga Reservoir. 2 meditations.
Sources: PowerPyx, GTA Culture, Tech4Gamers · Tracker · Meditation spots · Missables · Show on map
-
Waterfall
Approximate areaMeditation spotConfirmed · 3 sourcesLake Tallaloko · grid C6
A waterfall north-west of Lake Tallaloko. 2 meditations.
Sources: PowerPyx, GTA Culture, Tech4Gamers · Tracker · Meditation spots · Missables · Show on map
-
Ascent Mountain
Approximate areaMeditation spotConfirmed · 3 sourcesMount Kalaga National Park · grid C5
The summit of Mount Kalaga. Appears last, after the other spots. 1 meditation.
Sources: PowerPyx, GTA Culture, Tech4Gamers · Tracker · Meditation spots · Missables · Show on map
-
Bret Vogel: The hunter
Approximate areaSide-mission startConfirmed · 3 sourcesLummox County (a text marks the first hunt; county-level only) · grid C5
Start: Text marks Veteran Hunted in Lummox County. 2 missions; ticks when all are done.
Sources: Sixth Star, Output Lag, PowerPyx · Tracker · Side missions · Show on map
-
Pay ’n’ Spray – Grayson
Approximate areaPay ’n’ SprayConfirmed · 3 sourcesGrayson · grid C4
Repair and respray (clears “Vehicle recognized”, not your stars). From Chapter 3 it also registers and buys Standard Tracker cars.
Sources: LibertyCity.net, GTA 6 Wiki (Tech4Gamers), Leonipedia · Pay ’n’ Spray guide · Register a car · Show on map
-
Pay ’n’ Spray – Millport
Approximate areaPay ’n’ SprayConfirmed · 3 sourcesMillport · grid C7
Repair and respray (clears “Vehicle recognized”, not your stars). From Chapter 3 it also registers and buys Standard Tracker cars.
Sources: LibertyCity.net, GTA 6 Wiki (Tech4Gamers), Leonipedia · Pay ’n’ Spray guide · Register a car · Show on map
Ammu-Nation
PowerPyx lists 24 gun stores. Only shops whose sources name a labelled town are pinned here, as approximate area markers. The full list, including county-only stores, is in the Ammu-Nation locations answer.
Pawn & Gun – Port Gellhorn
Ammu-NationConfirmed · 2 sourcesApproximate areaPort Gellhorn · grid E3
Standard gun store in Port Gellhorn. PowerPyx (20 November 2026) lists “Pawn & Gun – Port Gellhorn” in Kelly County; LibertyCity.net’s map, opened the same day, names the same shop in Port Gellhorn. The pin marks that labelled town, not a street address.
Sources: PowerPyx, LibertyCity.net · Ammu-Nation locations · Weapons for 100% · Show on map
Hamlet Traders
Ammu-NationSingle sourceApproximate areaHamlet · grid I5
Standard store. PowerPyx lists “Hamlet Traders” in Vice-Dale County. The pin marks the labelled place Hamlet because that name is in the shop title; PowerPyx did not give a street. Approximate area pin. Single source for the shop list.
Sources: PowerPyx · Ammu-Nation locations · Weapons for 100% · Show on map
Tequesta Guns & Ammo
Ammu-NationSingle sourceApproximate areaTequesta · grid H7
Standard store. PowerPyx lists “Tequesta Guns & Ammo” in Vice-Dale County. The pin marks the labelled place Tequesta from the shop title; no street was published. Approximate area pin. Single source for the shop list.
Sources: PowerPyx · Ammu-Nation locations · Weapons for 100% · Show on map
Pawn & Gun – Crosstown
Ammu-NationSingle sourceApproximate areaCrosstown · grid G7
Standard store. PowerPyx lists “Pawn & Gun – Crosstown” in Vice-Dale County. The pin marks the labelled place Crosstown from the shop title; no street was published. Approximate area pin. Single source for the shop list.
Sources: PowerPyx · Ammu-Nation locations · Weapons for 100% · Show on map
Guns Aplenty!
Ammu-NationSingle sourceApproximate areaWatson Bay · grid J4
Hunting store. PowerPyx lists “Guns Aplenty!” in Mariana County. LibertyCity.net, opened 20 November 2026, is the source that names Watson Bay. The pin marks that labelled town, not a street address. Approximate, single-source place.
Sources: PowerPyx (county), LibertyCity.net (Watson Bay) · Ammu-Nation locations · Weapons for 100% · Show on map
Trading cards · single-source reports
59 card spots reported by The Big Lead whose directions name a place on the map. Not yet cross-checked; each card set page lists every report.
How this map is made
- The base map is ViceBoard’s own simplified drawing: a smoothed outline of Leonida’s coast and lakes, soft county zones and our own labels. No Rockstar map artwork or other sites’ tiles are shipped.
- Town and landmark positions, and the 1–9 / A–M grid, follow Rockstar’s free public Leonida map, so a grid square here is the same square on that map.
- A pin is placed at the area a guide names, nudged only by a direction the guide states. That puts it in the right neighbourhood, not on the exact doorstep, so every pin carries written directions.
- We publish a pin as Confirmed only when two independent publishers name the same area. Some fan wikis copy each other, so outlets that just cite another guide don’t count twice.
Related location guides
These lists are sourced separately from the pins on this map. Flamingo, stunt-jump and WAiNK pins appear here only when two guides name a place.
FAQ
Does ViceBoard use Rockstar map art?+
No. ViceBoard is an unofficial fan site. The base map is our own schematic drawing of Leonida’s coastline, counties and towns; no Rockstar map art or other sites’ map tiles are used. Grid references (for example G7) match the 1–9 / A–M grid on Rockstar’s free printable map so you can cross-check any pin.
How accurate are the pins?+
Each pin marks the town, district or landmark that published guides name, moved only by directions they state (“south side”, “north-west”). Open a pin for the exact directions and sources. A pin is “Confirmed” when 2+ independent publishers name the same area; one-source reports are labelled and hidden unless you switch on “Show single-source”.
Does ticking a pin update my trackers?+
Yes. Pins use the same progress store as the trophy, 100%, collectibles, money and side-mission trackers. Ticking a meditation spot adds its meditations to your count, a bank adds a Bank Job (and a vault for large banks), a shooting range adds its gold medals, and a side-mission start completes that questline.
Why are there no pins for flamingos, stunt jumps or Under the Bridges?+
Because nobody has published those locations from two independent sources yet, and we don’t guess. They’ll be added as soon as they are confirmed. Your counts for them live on the collectibles page.
Sources & verification
Last checked November 19, 2026. Map pins come from these published guides and Rockstar’s free public Leonida map (used for place names and the grid only). Spot a wrong pin? Tell us and it gets fixed fast.
- Rockstar Games: Leonida map (free print-ready download, grid index)
- PowerPyx: GTA 6 All Meditation Spot Locations
- GTA Culture: GTA 6 Meditation Spots
- Tech4Gamers: GTA 6 Meditation Spots
- PowerPyx: GTA 6 All Shooting Range Gold Medal Challenges
- Sweat School: GTA 6 Shooting Ranges, all 42 gold medals
- GTA Culture: GTA 6 Shooting Ranges
- PowerPyx: GTA 6 All Bank Jobs Locations
- LibertyCity.net: GTA 6 interactive map (banks, Pay ’n’ Spray layers)
- Leonipedia: Maximum Withdrawal
- PowerPyx: GTA 6 All Fence Locations
- Bloxodes: Which GTA 6 fence pays the most?
- Sixth Star: GTA 6 Strangers & Freaks
- Output Lag: GTA 6 Side Missions and Strangers & Freaks
- PowerPyx: GTA 6 All Strangers & Freaks Side Missions
- Output Lag: GTA 6 Trophy List
- PowerPyx: GTA 6 Trophy Guide & Roadmap
- Leonipedia: Catch Me If You Can
- Leonipedia: Sneakthief
- GTA 6 Wiki (Tech4Gamers): Pay ’n’ Spray
- Leonipedia: all 19 Pay ’n’ Spray locations
- The Big Lead: GTA 6 collectibles guide